%BLOG-5-SEC
I Ran a Real Security Audit Against My Own Linux Machine, Here Is What Actually Broke
Most hardening writeups you find online fall into one of two categories. The first is a checklist post: run this scanner, apply every suggestion it gives you, screenshot the final score, done. The second is a score-chasing post: someone pushes a hardening index from 61 to 95 by disabling half the operating system, and the article reads like a trophy case instead of a real system anyone would actually want to use.
I wanted to do something closer to what a security engineer actually does day to day, which is neither of those things. You run the scan, you read every single finding instead of skimming the alarming-looking ones, you decide which findings are real problems for your actual machine and which ones are generic advice that does not apply to your situation, you fix what is worth fixing, you write down why you are not fixing the rest, and then you verify the fix actually worked instead of trusting that running a command means the problem is solved. That is the whole project. No fictional company, no simulated stakeholder meeting, just a real Ubuntu 24.04 workstation, two open source scanning tools, and an honest account of what I found, including the parts where my own assumptions were wrong.
A personal machine is still a real attack surface
If you only use a computer for yourself, it is easy to assume security audits are something that happens to servers, not desktops. Nobody is going to breach my personal Ubuntu box for its business value because it does not have any. But that framing misses the actual risk. A personal workstation still holds SSH keys, still runs a browser with saved sessions to real accounts, still has sudo access to everything on it, and still talks to the internet constantly through updates, package installs, and whatever services happen to be running whether you remember installing them or not. The threat model is different from a production server, but it is not zero, and "it's just my personal machine" is exactly the kind of reasoning that lets small real issues sit unnoticed for years.
There is also a more practical reason this project is worth doing: reading about Lynis and rkhunter in a course is not the same as actually running them against a machine you use every day and then having to make real judgment calls about what the output means. A lot of the value in this project came from the parts that were not in any tutorial, like realizing a "warning" from a scanner was actually a real outage I had not noticed yet.
The tools
Lynis is a free, open source security auditing tool for Unix-based systems. It checks an enormous range of configuration areas, boot process and service security, user and authentication settings, file permissions, installed software versions against known vulnerability data, firewall state, kernel hardening options, and more, then scores the system with a hardening index out of 100 and produces a list of warnings and suggestions. rkhunter, rootkit hunter, does something different and narrower. It checks the machine for signs that it has already been compromised, comparing system binaries against known-good properties, scanning for the file signatures of hundreds of known rootkits and backdoors, and flagging suspicious network and system-level anomalies. Lynis tells you how hardened your configuration is. rkhunter tells you whether something has already gotten in. Running only one of the two leaves a real gap, so this project uses both.
Both tools are completely free and install directly from Ubuntu's package repositories. No paid lab environment, no cloud subscription, nothing beyond a Linux machine you already have.
sudo apt install lynis -y
sudo apt install rkhunter -y
Setting the scope honestly, before touching a single command
Before running anything, I wrote down the actual goal, because without a clear goal it is very easy for a project like this to turn into a scorched earth exercise where you disable every feature the machine has just to watch a number go up. My goal was "good enough for a real personal workstation," not "maximum possible hardening index." That distinction matters more than it sounds like it should. Lynis's scoring is calibrated against practices that make sense for production servers, compliance-governed environments, and multi-user systems under active administration. A lot of its suggestions, GRUB bootloader passwords, disabling USB storage, external logging hosts, password expiry policies, are genuinely good advice in the context they were designed for and genuinely unnecessary friction on a single-user development machine that only I have physical access to. I decided upfront that I would treat every suggestion as a question to answer rather than a box to check, and that I would write down my reasoning either way, fixed or skipped, instead of silently doing whatever was easiest.
Running the baseline scan
sudo lynis audit systemThe scan takes several minutes and walks through dozens of categories in sequence, boot and services, kernel, memory and processes, users and authentication, shells, file systems, USB devices, storage, networking, printers and spools, software firewalls, and on through more than two hundred individual tests. Watching it run section by section is genuinely useful on its own, because it shows you the shape of what the tool is checking before you ever get to the summary.
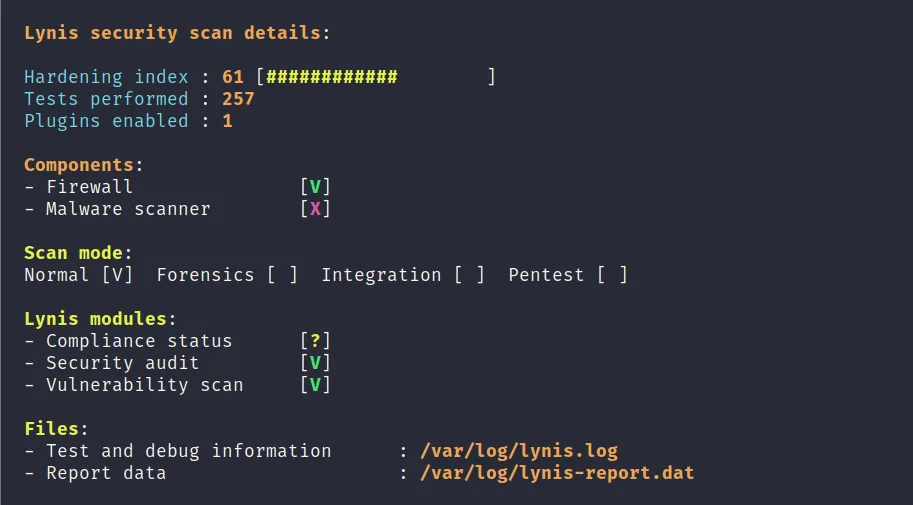
The baseline result:
- Hardening index: 61 out of 100
- Warnings: 3
- Suggestions: 44
- Tests performed: 257
A 61 is not a bad starting point for a stock desktop install that has never been specifically hardened. It just means there is real work to look at, three actual warnings and forty four suggestions worth reading through one at a time.
Triaging the three warnings
I want to be specific about the word triage here, because it is doing real work. Triage does not mean fixing everything. It means looking at each item and deciding, with reasoning, whether it is a real problem, a false positive, or something that needs more investigation before you can tell which one it is.
Warning one: vulnerable packages found
Lynis flagged outdated packages with known vulnerabilities under finding
PKGS-7392. Ubuntu already runs unattended-upgrades for
security patches automatically in the background, so my working theory was that this
warning was catching non-security package updates that had simply accumulated over
time rather than a gap in the automatic patching itself. The fix looked simple:
sudo apt update && sudo apt upgrade -y
This turned out to only be a partial fix, which I come back to in the
troubleshooting section below, because a second look with
lynis show details PKGS-7392 later showed dozens of security-relevant
packages still pending. The short version: apt upgrade will not touch a
package if resolving its dependencies requires removing or replacing something, and
apt full-upgrade will.
Warning two: SMTP banner discloses OS and software information
This one flagged Postfix, Ubuntu's default mail transport agent, for leaking version
and OS details through its SMTP banner under finding MAIL-8818. The real
question behind this warning is not "how do I hide the banner," it is "do I even need
a local mail server running on this machine." For a personal development
workstation, the honest answer was no. I do not send outbound mail from this box, and
Postfix had been sitting there since the base install, unused and unconfigured.
Rather than patch around the disclosure, I removed the service that was causing it.
sudo apt remove --purge postfix -y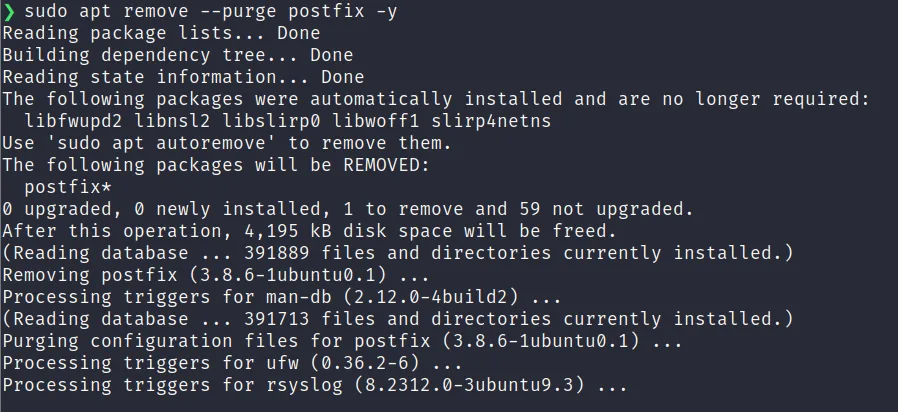
That is a small decision but it is the kind of decision that matters more than the specific command. A lot of hardening work is really asset inventory work in disguise, realizing a service exists on your system that you never deliberately decided to run.
Warning three: all Fail2ban jails disabled
This is the warning that turned into the most interesting part of the whole project, so I am going to walk through it carefully.
Lynis flagged that Fail2ban, which I had installed specifically to protect SSH
against brute force login attempts, appeared to have every jail disabled under
finding TOOL-5104. My first instinct was that this was a Lynis false
positive. Lynis performs mostly static analysis, meaning it reads configuration files
rather than querying running services directly, and
Fail2ban's config format has a [DEFAULT] section whose values individual jail sections like [sshd] can override
with their own settings. A scanner reading the file top to bottom without fully
modeling that override behavior could plausibly flag the whole thing as disabled when
it is not. That was a reasonable hypothesis. It was also wrong, and I only found that
out because I checked instead of assuming.
sudo fail2ban-client status
sudo fail2ban-client status sshd
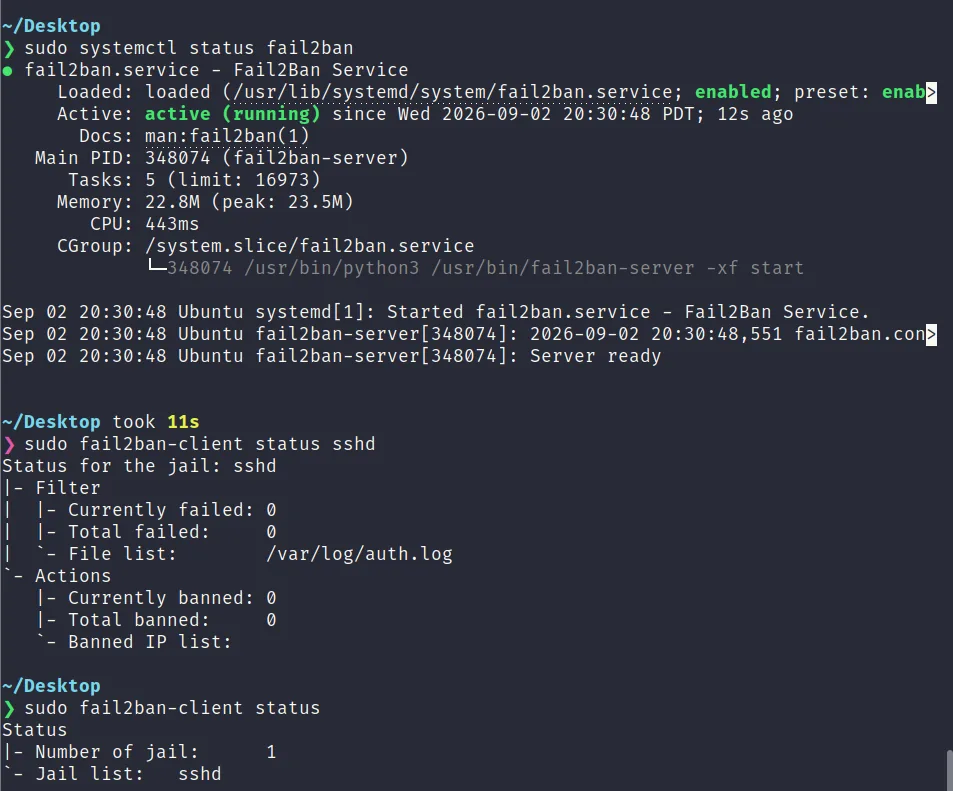
The live status command showed the Fail2ban service was not running at all. It had
crashed. systemctl status fail2ban confirmed it, exit status 255, an
exception, and a timestamp showing it had been down for roughly three hours already.
That is the moment this stopped being a documentation exercise and became a real
incident, however small. My SSH protection had silently gone offline hours earlier
and I had no idea until a config auditor happened to flag something adjacent to it.
I went digging with journalctl -u fail2ban -n 30 --no-pager to find the
actual root cause. What I found was a mistake in my own jail.local file
from when I had originally set Fail2ban up. Somewhere near the top of the file there
is an instructional example block, meant purely as documentation showing the format
jail sections should follow, not something meant to actually run. At some point while
configuring the sshd jail, I had added my real settings, max retry count, ban time,
find time, underneath that example block instead of under the real functional
[sshd] section further down in the file. Worse, the section header
directly above my settings had been left commented out as # [sshd],
while the key-value pairs underneath it were left uncommented. That produced a parse
error, file contains no section headers, because Fail2ban found configuration values
sitting under nothing.
My first attempted fix was to just uncomment that header, turning
# [sshd] into [sshd]. That revealed a second problem. The
file already has its own separate, fully functional [sshd] section
further down, part of Fail2ban's standard shipped configuration under the real jails
section. Uncommenting the top one created two sections with the same name, which
Fail2ban correctly rejected with a duplicate section error.
The actual fix was to leave that top instructional block exactly as it originally
shipped, fully commented out, and instead add my real settings,
enabled = true, maxretry = 4, bantime = 3600,
findtime = 600, into the real [sshd] section further down,
appending them to the existing port, logpath, and
backend lines that were already there rather than replacing anything.
sudo fail2ban-client reload
sudo systemctl status fail2ban
sudo fail2ban-client status sshd
Once reloaded, the service came back and the sshd jail showed active with zero currently failed and zero currently banned, which is the expected state on a quiet system with a working jail rather than an actual sign of nothing being protected.
The lesson here is bigger than Fail2ban specifically. Never trust that a config edit worked just because the file now looks correct to you. Check the live, running state of the service with the tool's own status command. And when you go to fix a misconfigured file, read enough surrounding context to understand which parts are real functional configuration and which parts are example or documentation text left in by default, because they can look nearly identical at a glance.
Working through the forty four suggestions
Forty four is a lot of individual items, so rather than going through all of them one by one here, I will describe how I split them and give a few representative examples in each direction. The full item by item breakdown with reasoning for every skipped suggestion lives in the project's AUDIT.md file on GitHub.
Six suggestions genuinely made sense for this machine and I acted on them.
Cleaning up old package remnants left over from previous removals:
sudo apt autoremove --purge -yInstalling rkhunter as the dedicated rootkit and backdoor scanner Lynis itself does not replace:
sudo rkhunter --update
sudo rkhunter --check
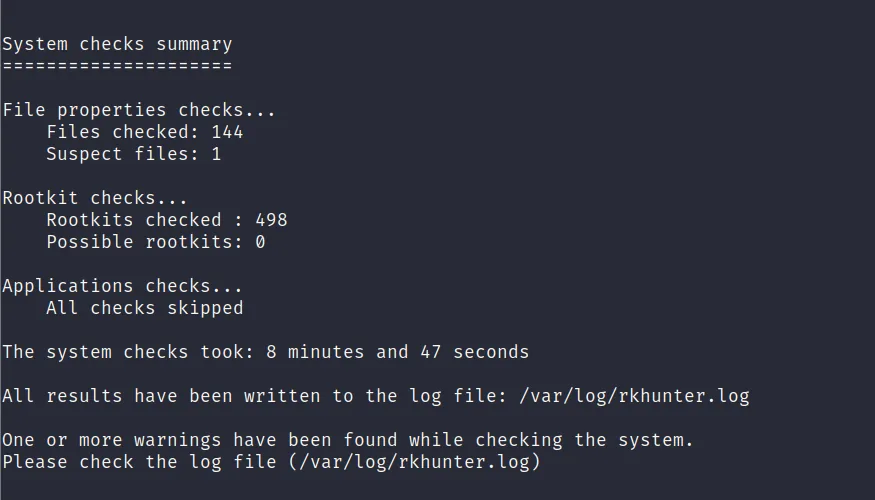
The scan checks system binaries against known-good properties, walks through several hundred known rootkit signatures, all of which came back not found, and performs malware, network, and account level checks. The final summary showed 144 files checked, 498 rootkits checked against, zero possible rootkits found, which is the number that actually matters here. It also flagged one suspect file and a general warnings notice worth a closer look in the log file later, rkhunter has a known tendency to flag file property changes after routine package updates as a false positive pattern, but I want to be honest that I did not personally trace that specific flag down to full certainty in this pass, and I am not going to claim a cleaner result than what I actually verified.
Disabling unused network protocols that this machine has no legitimate reason to use, which reduces attack surface for essentially zero cost:
echo "install dccp /bin/false
install sctp /bin/false
install rds /bin/false
install tipc /bin/false" | sudo tee /etc/modprobe.d/disable-unused-protocols.conf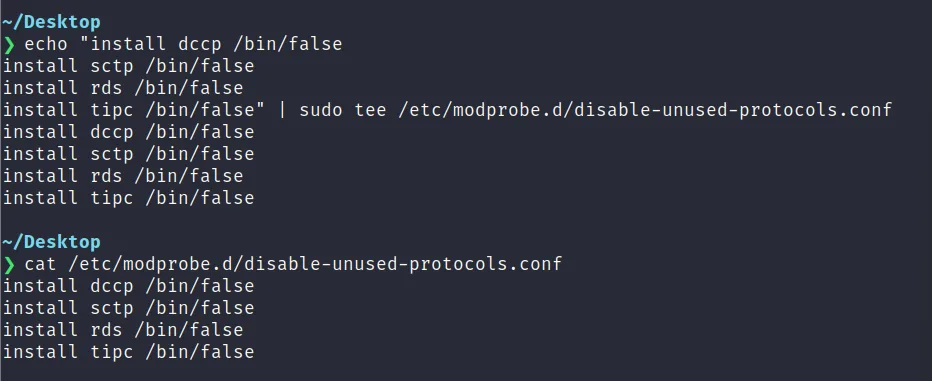
The other thirty eight suggestions I deliberately left alone, and the reasoning matters more than the list itself. Things like a GRUB bootloader password exist to protect against someone with physical access to the machine tampering with boot options, which is not a realistic threat for a machine only I can reach. Password expiry policies and separate partitions for home, tmp, and var are patterns built for managed multi-user enterprise environments, not a single-user development box. Disabling USB storage is a data loss prevention control meant to stop exfiltration on corporate machines, not something relevant to my own threat model. File integrity monitoring tools like AIDE, which alert on unexpected file changes, are extremely valuable on a server that should not change much, and actively unhelpful on a development machine where files change constantly by design through normal dev work. None of these are bad suggestions in the abstract. They are suggestions built for a different kind of system than the one I actually run, and chasing a higher score by applying them anyway would have made the machine worse to actually use without making it meaningfully safer.
Real troubleshooting, not just the fixes that worked cleanly
Beyond the Fail2ban incident above, three smaller things went sideways during this project and I kept them in rather than editing them out, because a walkthrough where every single command works perfectly the first time is not really representative of what this work looks like in practice.
Postfix, which I had just purged, came back on its own partway through the batch of fixes. Installing rkhunter apparently pulled in a dependency that required some mail transport agent to satisfy it, and apt resolved that by silently reinstalling Postfix, which then popped up a blocking interactive configuration dialog mid terminal session. I selected "No configuration" in that prompt, which leaves Postfix installed but fully inert, no listening SMTP service and nothing left to leak a banner, and confirmed afterward that the original warning did not resurface in the next scan.
An unrelated apt error kept surfacing during the upgrade step, tracing back to a long abandoned PPA, Flat Remix, from an old desktop theming phase months earlier. That PPA never shipped builds for Ubuntu 24.04 and had been effectively dead weight sitting in my sources ever since.
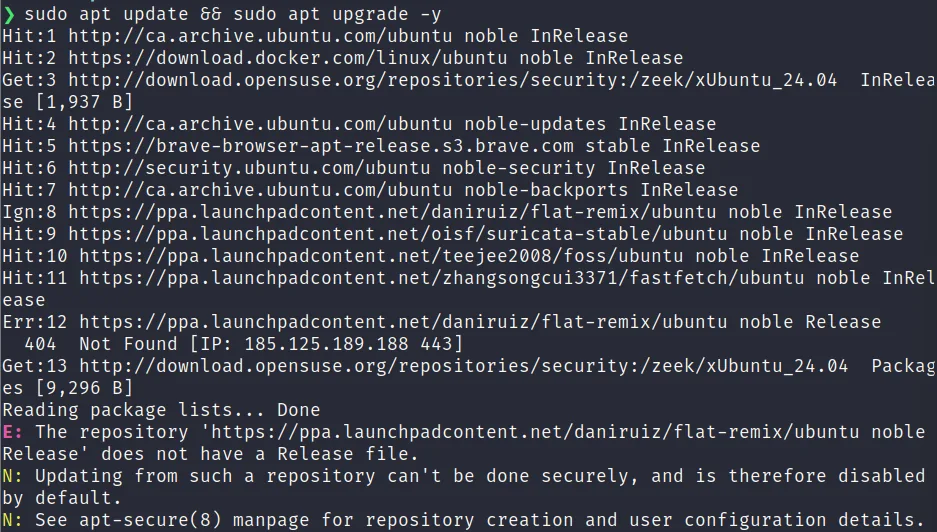
Cleanup was a one-liner:
sudo add-apt-repository --remove ppa:daniruiz/flat-remix -y
And as mentioned above, my first pass at fixing the vulnerable packages warning was
incomplete. Running lynis show details PKGS-7392 again after the initial
upgrade still showed roughly fifty pending security-relevant packages, things like
bind9, ncurses, util-linux, and several webkit components. The fix was switching from
apt upgrade to
apt full-upgrade,
since plain upgrade will hold back a package entirely if satisfying its dependencies
would require removing or replacing something else, while full-upgrade is allowed to
make those removals and replacements to fully resolve the chain.
sudo apt update && sudo apt full-upgrade -yRe-running the scan and the real before and after
Once the warnings were resolved and the six suggestions were actioned, I ran Lynis again from a clean terminal.
sudo lynis audit system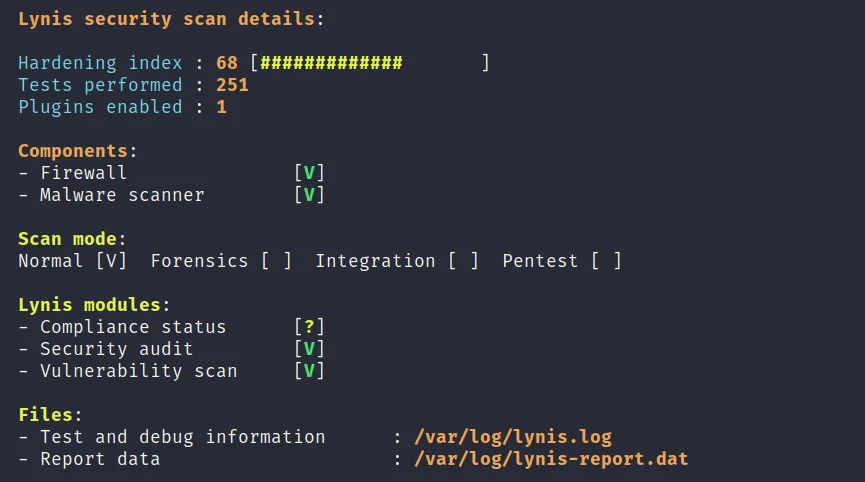
| Metric | Before | After |
|---|---|---|
| Hardening index | 61 | 68 |
| Warnings | 3 | 0 |
| Malware scanner component | Not installed | Installed and detected (rkhunter) |
| Tests performed | 257 | 251 |
The test count actually going down slightly makes sense once you think about it, several tests were specifically checking Postfix related configuration, and with Postfix effectively removed from active service those tests no longer applied.
A seven point jump on the hardening index is not a dramatic number by itself, and the number was never really the point. The point is that three real issues got found and fixed, one of which, a security service that had actually crashed and stayed down for hours without my knowledge, would not have surfaced without running this audit in the first place. That is the actual value of doing this kind of work regularly rather than as a one-time exercise.
What ongoing maintenance actually looks like here
Nothing about this needs to be automated or scheduled to be worthwhile. I plan to re-run both scans every month or two, or any time I make a meaningful change to the machine, installing a new service, opening a new port, adding new tooling.
sudo lynis audit system
sudo rkhunter --update && sudo rkhunter --check
That is the whole maintenance plan. Low effort, low friction, and it is exactly the kind of habit that would have caught the Fail2ban outage days sooner instead of it sitting there unnoticed until an unrelated scan happened to surface it.
From a personal desktop to real organizational scale
This ran against my personal machine, so there is no server team here, no change advisory board, no department affected by a remediation rollout the way there would be at organizational scale. That is also what makes the underlying process worth paying attention to: it maps directly onto real work at any size, which is where the actual transferable value sits. A systems administrator running this same audit against a fleet of production servers is doing exactly what happened here: baseline scan, triage every single finding instead of only the alarming looking ones, fix what is real, write down clearly why the rest is being accepted rather than silently ignored, then re-scan to confirm the fix actually took effect instead of trusting a script's exit code. This project follows the same audit-then-remediate discipline as the vulnerability management program I built in a previous project in this series, just run solo against a single machine instead of coordinated through a policy and a Change Advisory Board.
The one thing that changes at real organizational scale is that "I decided to skip this one and here is why" has to become a written, approved risk acceptance with a named owner and a review date, instead of a personal judgment call made alone at a single desk. And "verify against live service state before trusting what a static scanner is telling you" is precisely the kind of check that saves a whole team from burning an afternoon chasing a scanner's false alarm when the real problem, like this one, was a completely different service quietly down in the background the whole time.
Try it yourself
The full walkthrough, every screenshot, and the complete item by item reasoning behind every one of the thirty eight skipped suggestions are in the GitHub repository linked here.
Repository: github.com/rachata072/linux-hardening-audit-lynis-rkhunter
This is the fourth project in an ongoing series of hands-on IT support and cybersecurity projects I'm building for my portfolio (more on my background here). More lab notes and write-ups land here as each one ships.